I currently work for a college where theater is a fun thing to do on the side, but not the main event. We have a lot of fun, but the budgets are tiny. One of my first shows there was “The Ladies Man,” which is a door slamming farce that requires a small turntable for a gimmick. We’ve since used that same turntable a couple times… although due to a recent water issue in our storage area if we use it again we’ll need to rebuild the platform pieces because they got very wet and warped. The pictures included were when we used it for our production of “The Lion in Winter.”
There are a few ways to effectively build a turntable, but here I’m going to give you the rundown on what I did for this one and why I did it that way.
The turntable I planned would consist of three main elements.
- A pivot point
- Castors
- A stress skin round platform
The Pivot Point
I knew what I wanted for a pivot point, but without welding capabilities I wasn’t sure how to get it. Basically what you want is a short pipe that can be attached to the floor vertically and then another short pipe that can be attached to the center of the circular platform vertically that is larger than the one on the floor so that it can slide over that one and spin with just a little bit of wiggle room. I knew that it was possible to get threaded pipe and flanges to do that, but it seemed to me that once this turntable was built, it would probably be used again and I wanted something that was fool proof. SO I advertised on craigslist describing what I wanted. I wanted a 6-8” sturdy metal plate with a hole in each corner the right size for lag bolts. In the center I wanted a pipe about 2.5” in diameter. I wanted a second that was the same except the pipe wanted to be able to slide over the first and each piece should be 5 ½” tall. It is VERY important that the pipes are attached perfectly square to the bases. I also explained what it was for and I asked for quotes. I got a LOT of responses where a hobbist was like “I have a welder… if you give me the metal I can do that.” What I was looking for, however, was someone who did that for a living and just had some scrap they were willing to throw together and sell me. I did eventually end up with exactly that kind of person responding and he charged us $50 for the whole thing and it was PERFECT.
Why that height? Because the finished height of the casters to the bottom of the platform was 6 1/4 “ and it’s important for the pivot to be long enough to stay sturdy but a little shorter than the whole thing so that the top and bottom edges of the pipe don’t rub against the top and bottom plates and make extra noise.
Casters

These castors are installed correctly for our turntable.
Fancy-pants physics people can give you the exact reason for this, but the bottom line is if you have bigger casters you need fewer of them and the whole thing will run more smoothly because there’s less friction. On the other hand, the bigger the caster the more expensive it is… and the cost goes up very quickly with size. I did this with 4” heavy duty casters and while I couldn’t have afforded anything bigger, I wish I could have because it would have worked better. SO, get the biggest caster you can afford.
The casters should be straight casters, NOT swivel casters. Why? Think about when you drive a cart at the grocery store and you go from
forward to reverse. You know how it kind of veers a tiny bit to a side to get the wheel turned around? A turntable can’t do that little veer to the side so if a caster gets turned around the whole thing gets stuck.
The straight casters get set up perpendicular to the pivot point and they spin just fine.
The Stress Skin Platform
What is a stress skin platform? Usually in theater a platform has a 2×4 frame that sits the tall way and then a piece of plywood is put on top. With a stress skin platform the framing is laid flat (the short way) and plywood is attached to both the top and bottom making a sandwich. The fact that there is facing on both sides limits the flex in the unit even though the framing is short. There are times this kind of framing is a huge advantage and this is one of them.
With the double sided platform we can hook the casters to the floor pointing up instead of to the platform pointing down, which has a few advantages. First, the floor of our stage is much bumpier than the bottom of my freshly built platform, so when the turntable spins there are fewer bumps making “ka chunk, ka chunk” noises as it spins. Second, people are slobs and trash in many theaters will periodically get kicked under platforming. With the casters upside down and not moving around trash kicked under the turntable is much less likely to get stuck in the works. Also, casters aren’t as likely to bump into things that will throw them out of alignment and get the whole thing stuck. SO, this method of platforming allows the whole thing to run more quietly and be less likely to get stuck.
Platform Size
Our turntable was 8’ around. (To be precise it was 7’-11”.) Why that size? It was the biggest we could build using four sheets of plywood, and four sheets is what we could afford.
Building the platform
I split the platform structure into two pieces and framed it so that I could add a 2×4 along the center as a piece of “tongue and groove” support. This center 2×4 is only attached with screws so that it can be removed and the turntable platform units can split in two for easy storage. (If I left it whole the unit wouldn’t fit through the doors into our storage area and we wanted to keep it to use it again.) I also made sure I had a 2×4 support running along other places I knew I’d have walls, so I could attach them completely and then made up the rest to look structural. The usual decision making on how to frame a platform applies here. Plan your framing placement to fit your needs.
Installation of Casters
Before attaching the casters to the ground we lag bolted them to strips of 2×4. We then used 3” screws to attach the 2×4 to the stage. By adding the 2×4 we avoided needing to drill bigger lag bolt sized holes in the stage floor and we simplified the installation for future use of the turntable. If we had decided to lag the casters straight into the stage the overall height of our pivot point would need to be shorter.
We used 12 casters. I wasn’t entirely sure how many we should use for optimal performance, but 12 did work. It was a bit stiff to operate and while one person could move it, 2-4 moved it more smoothly.
When laying the casters out it is VERY important that the straight line of the way the caster rolls is perpendicular to the line off the center of the pivot point… that is the MOST important thing about getting the casters installed. The casters can all be different distances from each other and from the center, but if they are not at a right angle to the center they will not run smoothly. We accomplished this by snapping some chalk lines through center and then drawing lines with a framing square at a right angle to those lines and lining up the casters to those lines. I picked a fairly evenly spaced pattern to lay out the casters in, making sure there was at least one caster in any 2’ square section and also making sure there were more casters along the edge.
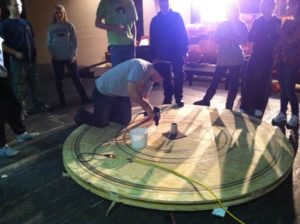
Here a student is actively screwing the plywood from one side onto the “tongue” of 2×4, and we have just attached the pivot point to the center. with lag bolts. All the people standing around are waiting to help support while we flip it onto the pivot.
Installation of Pivot
It is very important that the pivot point is installed perfectly centered on both the floor and the platform unit. If it is not centered on the floor then turning it will cause torque on the casters that will both stress them and cause terrible groaning noise when you turn it. If the pivot point is not centered on the platform unit then you will spin off center and any scenery installed around it (i.e. a surrounding platform) will need bigger gaps for hitting not to occur and sometimes those gaps will be bigger than others. If you don’t want a 2” gap to prevent rubbing accidents, then center it carefully. (Tip: If you are building a surrounding platform, cut your turntable out carefully and save the corner scrap pieces you cut off. You can cut a little more off those edges for clearance and use those pieces to build that custom surrounding platform.) I also install the piece of the pivot point with the bigger piece of pipe on top so it slides over the bottom piece rather than into the bottom piece. I believe that offers just a little more protection from stuff getting into the two pipe pieces and gumming up the works.

A student applies grease to the pivot to avoid squeaky noises.
After attaching the pivot, I suggest using some sort of lubricant. Opinions differ on this topic, because it has potential to gum up the works, but it also reduces metal on metal squeaking. In this case we used automotive lithium grease.
Installing the Turntable
After installing the pivot point on both pieces you will need enough people to flip the platform unit over and slide the pivot point onto itself so that you have even support all the way around and the “weak” seam is not stressed. I stand the unit up so that the week seam stands perpendicular to the floor NOT so that it is parallel to the floor and then walk it down. That offers the weak seam the most support. It is best to have enough people available during the flipping process that it is well supported all the way around.
Once the unit is flipped and the pivot is slid onto itself, the turntable should work. If you are attaching walls or any sort of structure to the top of the turntable, you will want to troubleshoot any potential issues before attaching the structure. Spin it lots. Spin it with people on it. Spin it with weight on it. Listen for noises and other signs that something isn’t working quite right. watch what is happening underneath while it spins. Take the time to make sure this is right or you’ll hate yourself later.
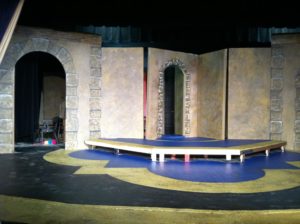
Note the gaps between the walls, included on purpose for safety.
Notes on Specific Show Choices
With walls that have any sort of thickness and students running it, it is safest to leave a gap between sets of walls and find a creative way to mask that gap. Students WILL push the unit from the walls (even if they aren’t supposed to) and not having a gap can cause finger injuries. It also leaves you more wiggle room for if walls are perfectly square or whatnot.
In this case I used a woodgrained pillar accent to mask the gaps. The pillar was hollow on the backside.
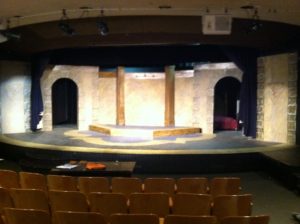
For this show I already had the turntable, and the show had an exceptionally tiny budget with a show that needed to go to many different rooms in the same castle, so since we couldn’t change “locations” entirely I used it to change the energy of the space. A flat wall feels different than a door angled toward SL which feels different from a door angled SR. The rest of the change in rooms in the castle was achieved with furniture.


Scaling Up
I’ve used this same technique (ages ago) to build a 16’ turntable that also ran on the low-tech people pushing it. It needed bigger casters and more people to turn than was ideal (I want to say 6 strong people), so I’m not positive I’d recommend doing that, but it did work. Really, if you’re going this large you probably want to start engineering a better way to spin and that goes beyond the simple tutorials this blog intends to provide.