As I was going through pictures of work I’ve done, looking for a process to write about, I stumbled across this series of pictures. I don’t remember what show this was for, however I do remember it was at our local community college and I was working with student helpers, so it’s a fun, easy, fast painting process. This kind of semi-cartoony dimensional painting works really well for a lot of children’s theater.
Step 1- Basecoat
Basecoat (and maybe texture) in the color you want the wall to be. The wall here is somewhat cartoony, so the base coat is flat with just a bit of black spatter. If you are looking for more realism you may want to add some texture in this step… but that would make the process longer and more complicated. (For example, for a weathered clapboard you may want to give it a “grain” with a horizontal wetblend… but someday a variation like that’ll be a different article here.)
Step 2- Lay out lines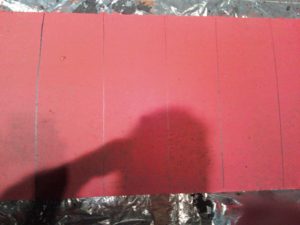
I took luaun that was cut to the right width and just traced it over and over again with a black sharpee. The sharpee lines become part of the deep part of the shadow lines, so use black. Make sure that if walls are next to each other the lines are in EXACTLY the same location. It is best to lay out walls next to each other at the same time to ensure that happens.
Step 3- Spatter shadows
I layed out luaun strips so tha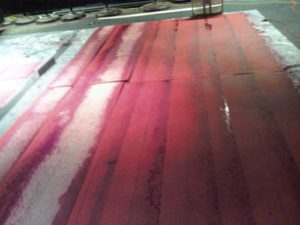 t one row was covered, the next row was not covered, the next row was covered… and I worked one row at a time. I jumped around a little so the luaun was never over wet paint. (If the “boards” in the picture to the side look different sizes, it’s because in most places only every other board is spattered and we’re in the process of going back and spattering the other boards.) Then I spattered using a dark paint that wasn’t black… in this case it was a very purplish dark red. Black-only spatter for this step will look VERY cartoony. The spatter wants to be heavy in the side that is UP and lighter/ almost non-existant on the side that is down. That means you want to control your spatte
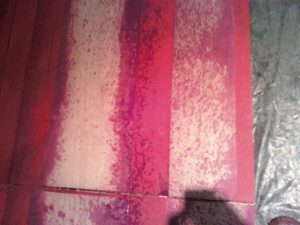 r and aim it a bit. This is one of the few times you may want to spatter with your brush sideways to get “lines” of spatter, although in this case we used a sprayer to spatter and just did a quick pass fairly close. It also means you probably want to stand perpendicular to the clapboard (on a side rather than the top or bottom) and throw the paint across. The spatter wants to be heaviest right along the seam. Be careful to let the luaun dry/ soak in paint a bit before moving to the next row. (It helps to have extra luaun strips. I had more than one set to use and had one crew pair setting up luaun, while another crew pair spattered. You could use a couple different color spatters, depending on your exact goals. In this case we did use a touch of black spatter with the purple/ red. The purple/red was used quite heavily and wet to the point it just barely wanted to run a little and then the black was spattered on top lightly when it was at least somewhat dry…. But it was done not long after and before moving luaun so we didn’t wait too long.
Step 4- Plan deterioration
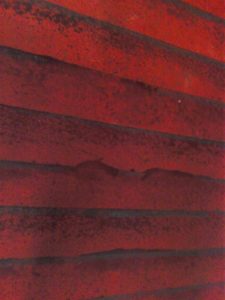
You don’t have to do this part, but at this point we went th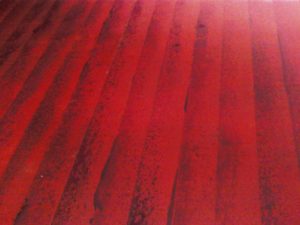 rough and found places where we wanted the boards to look like the were deteriorating, and we added some shadow to those parts with a brush. This step could happen as part of the lining, but in this case we did it first. We did use this step to hide a few of the places the spatter bled under the luaun and made
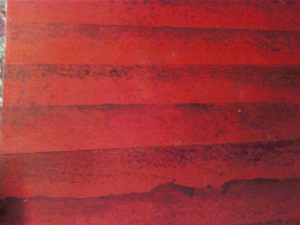 the spatter lines less than straight. If you are looking for pristine you may need to touch up some of your base instead of adding deterioration. This step is one of the few I didn’t have students do in this process. It’s the “artistic eye” moment where you are trying to deliver a touch of detail. Most of the steps can be done by anyone, but this step does require some thought.
Step 5- Lining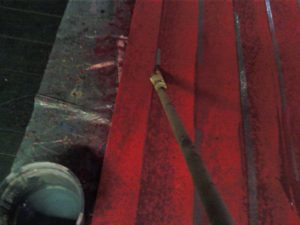
Mix up some lining black (which may be about the same texture as your spatter) I like to hook my lining brush to a pole, so I can do this part standing. If I have bamboo available, I use that with my brush in the middle. If not, I just tape it to the side of a broom handle with masking tape. If you don’t have a lining brush (or a “scenic fitch” brush), you can use a 1” or smaller brush with longish bristles. I’ve even used a chip brush in a jam, but a lining brush will do the job best. Paint the shadow line on the “dark” side of the sharpee line.The straighter and more even the line is the “newer” the siding will look… although too straight and consistant can look more cartoony without other steps. If you want it perfectly straight, use a lining stick, but in this case we “freehanded” but followed the sharpee lines as a guide. The aim for this wall was a little weathered looking, so the exact straightness was varied on purpose.
A Couple Options for Further Steps
For this project, that’s all we did, but depending on the exact look you are going for you may want to add some highlights to the bottom edges of the boards or some highlight spatter to the bottom parts when doing the spatter process.