Spattering is one of the easiest techniques to learn, but one of the hardest to completely control. In my opinion, this is by far the most fun painting method ever.
Someday I do want to add a video tutorial or at least more pictures to this section, but for now this is better than nothing… and I do use spatter all the painting tutorials I’ve posted so far.
Uses for Spatter
Back in the old days, spatter was used heavily on just about all scenery. Scenery used to be more paint than real objects, and when trying to give the illusion of dimension, spatter can help that illusion seem more real and less cartoony. It adds depth and texture. Today, while this is sometimes still the case, spatter is usually used more sparingly for these techniques, as more and more real objects are used, especially in more intimate spaces. I still use it a lot for this purpose in large theaters.
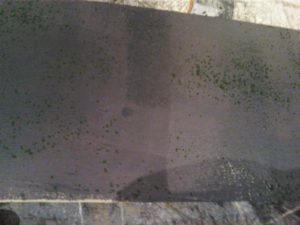
Spatter is the best technique for painting a faux granite. Granite is generally just a bunch of dots, when it comes right down to it, so layers of spatter in the right colors and sealed correctly can be difficult to tell apart from the “real” texture. It is also a great technique for breaking up otherwise flat surfaces in a less realistic setting. I love to design floors with spattered textures, because when the colors are chosen and layered well, the lighting designer can literally change the entire coloring of the space for different scenes with minimal effort.
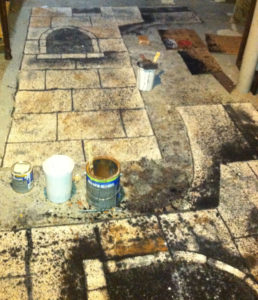
Example
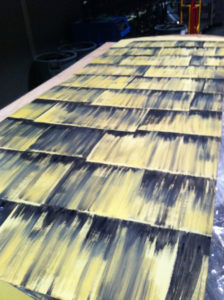
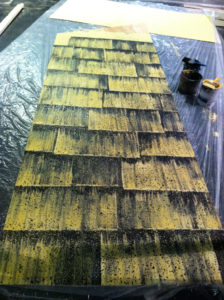
Notice how, in the pictures below, the one on the right has been spattered and looks more “real”. These are both completely painted on flat surfaces and both have a look of dimension, but the spatter does something that makes it better. These two are exactly the same flat with the only difference being a couple different colors of spatter.
Spatter is not Splatter
Splatter is actually a slightly different painting technique that is spattering onto a wet surface so the little droplets bleed out a little. It looks different and so the technical term is different, but I do feel the need to say this because calling spatter splatter is a common mistake for those learning.
Brush Spatter
Spattering Brush
I like to spatter with a long bristled 4” wide brush. It doesn’t need to be a very pricey brush, but ideally it should be better than a chip brush and have soft, flexible bristles. The longer bristles mean you won’t have to dip as frequently or snap your wrist as hard.
Preparing the paint
Spatter paint wants to be thinned. For most spatter effects, you will want the little dots to be translucent, because this creates greater depth. The exact thickness you want the paint will vary depending on the desired effect, but the texture will be somewhere around 1% or skim milk. When you plan on spattering over the course of a few days, mix the colors you want full strength, and only thin a little at a time. If you thin it all, you will come back the next day and find it to be to thin on top, and a gunky mess on the bottom, because watering it down that far will actually start to break to composition of the paint.
Don’t water your paint down until you’re ready to use it. If you are going to be spattering muliple days, mix the color of your spatter full thickness and water it down in batches. You’re watering it down enough that it can chemically “break” the paint and if that happens when you come in the next day all the pigment will be stuck to the bottom and it’ll be mostly water on top and it’s often impossible to mix them back together and even if you succeed it’s more likely to clog your sprayer because there will be chunks.
Preparing the surface
It is easiest to spatter on a horizontal surface, so lay the scenery down. A vertical spatter will be extremely likely to run, and then your spatter will resemble bird poo on your windshield. If your vertical surface is a soft-good, like muslin, you can get away with a light spatter, if you are careful, because it will soak in before running. When spattering on a vertical surface, you may want a slightly thicker paint.
The Tap
When I teach people how to spatter, I often begin by showing them how to spatter by holding the handle in their right hand and tapping the flat ferule (metal part) of the brush against either the palm of their left hand, or a small board held by their left hand, depending on how they seem more comfortable. This technique is not recommended for long-term use, as it can be hard on your left hand, but it is much easier to control the spatter with the tap.
The Wrist Flick
Most of the time, I spatter with a wrist flick instead of a tap. The wrist flick is faster and easier on the muscles than tapping. This is a technique that just takes practice to learn and I’m convinced that everyone does it with a flair all their own.
Example
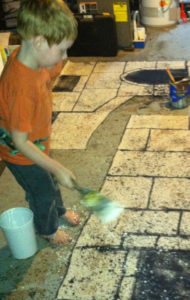
A few years ago my son wanted to help paint some “scenery” for a Knights themed VBS. He wanted to do it all himself, so I planned it and he painted it… with minor help moments from me and a lot of supervison. (He was only 4 at the time, but in some ways actually required less supervision than the average college freshman.) Ironically, this is currently the only picture I have in all my collection of someone in the process of spattering. He’s using the wrist flick technique. Spattering is his favorite technique too, and if I’m ever teaching spattering when he has a snow day or needs to accompany me to school for a reason like that, I have him help me teach that technique. (He’s 7 now, so he’s even better.) His droplets are kind of big in this picture partially because he’s so close to what he is spattering… but he was kind of short back then.
Tips and Tricks
If you are new to spattering, practice on scrap before trying out your technique on actual scenery. Push the limits while you practice, and learn exactly what things cause goobers.
Until you’ve been doing this a long time, always test your first tap or flick after dipping your brush. If there is too much paint in the brush, you will goober, even with the best technique.
Always (unluess you have a specific reason not to) spatter by flicking or tapping in the direction of the wide side of the brush. If you spatter toward the narrow side of the brush, you will goober.
When you need an especially small spatter, or when you need extra control, tap, don’t flick. You can also get more control and smaller dots by using a shorter bristled brush and thicker paint. If you are spattering on a curved or non-horizontal surface, that’s the way to go.
Keep moving when you spatter to avoid “lines” in the spatter and to keep the spatter pattern as random as possible.
The exact texture of your spatter is affected by how you tap or flick, the exact thickness of your paint, the surface you are spattering and how wet or dry that surface is. If you are not achieving exactly the texture you are aiming for, try playing with these componants. For example, if you are looking for a tight, small spatter, use a drier brush, tap and let your spatter dry between layers.
Sprayer Spatter
If you have a ton of spattering to do, you may want to invest in a sprayer. The name brand kind that will do the best and last the longest is a “Hudson” sprayer, but you can also use any of the variety of garden sprayers (even the small ones) that you pump up with air pressure to get spraying. They spatter FAST, but they take a LONG time to clean. The more expensive ones spray more evenly and have parts that you can really abuse. The less expensive ones die more quickly. I often like to use the little garden (I think they are about a quart size) sprayers when I want more than one color of spatter available at the same time. If you use them a lot, you will need to learn how to take apart all the pieces to clean them more thoroughly than I describe and then put them back together. Sometimes they get clogged in weird places over time and you can fix that.
- Mix your spatter. If it’s too thick it won’t work right, so if you mix and use and it’s not spraying, water it down more.
- Put it in the sprayer as far up as the sprayer directions say you can. Pump up the air and then test spray to make sure that you have it “raining” and not “streaming”
- Use it. You can dump it out and change colors without washing completely as long as a little cross contamination doesn’t alter your colors too much… just spray for a little after reloading until the color changes. At first use it with short touches to the button pointed up a little till you get the hang of it and move while spraying LOTS. It’s really easy to go too heavy at first.
- To wash your sprayer, dump the excess paint. Rinse the drum until the water is coming out clear, then run clear water through it until it’s coming out clear. Then take the nozzle tip off and make sure that part is clean too. This process can take a long time.
Spray Bottle Spatter
I know people who like to use spray bottles for small amounts of spatter, but I find that brush spatter is better for small scale so I don’t do that. It’s pretty much the same as the Hudson-style sprayer technique, except your hand gets a workout squeezing.