This article will discuss primarily the painting method used to paint some faux rusty/ grimy pipe made from sonotube, but also address some of the basics concerning the construction of the unit.
Since moving to Utica, NY I have spent a lot of time working at Mohawk Valley Community College. They have often hired me to come in and work with student volunteers to paint scenery. Frequently, there are heavy time constraints and the experience level of the volunteers is minimal. When painting with them I try to balance between teaching a couple good techniques and quick, dirty ways to get the right effect.
Construction Thoughts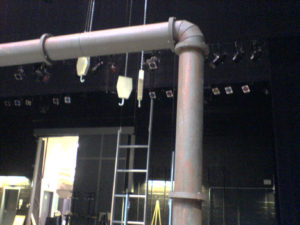
This pipe unit I am about to talk about was a false proscenium for a production of The Glass Menagerie at MVCC which was designed by Michael Diederich, the TD there. The pipes themselves were constructed using sonotube with foam cut out to form the detailing and aluminum duct pieces for the 90 degree angles at the top corners. It is mostly supported by cable looped around the tube and attached to the rigging system. To hook the different pieces of sonotube together, round disks of wood were cut to fit perfectly inside the edge of the tube. The wood was then placed so it split the seam of the sonotube and screwed from the outside of both pieces. This method does not create an overly structural seam, but keeps the seams clean and the rigging does the rest of the support work. The seams were planned in such a way that foam detailing hid them all.
Priming
These particular pieces of sonotube had been used in a prior production and therefore already had a decent base of paint on them. If you have “fresh” sonotube you may want to consider base coating with a thick, slightly textured paint for two reasons. First, there are words printed all over the outside of sonotube, and it will take a few coats of plain paint to get them to stop bleeding through. Second, like on a paper towel roll, sonotube has a kind of spiral groove in it. A paint with some texture to it can help minimize how visible that groove is from your audience, and how much you have to worry about your paint treatment accentuating it.
Base Coat and Spatter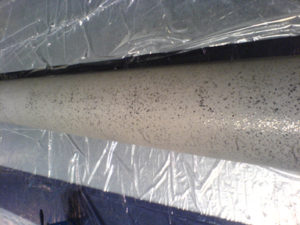
Because these tubes were already well primed, I went straight for the base coat in the color we needed, which was a pipe gray. (Note: Sonotube can be based using a roller and it is MUCH faster than a brush.) I wanted to spatter with a black on the gray to add a sense of texture… old pipe is very textured in that speckled kind of way. Spattering on a rounded surface is tricky business because the spatter is a bit thin and wants to run around the edges to the bottom. Use a slightly thicker spatter than usual, so hand spatter rather than use a Hudson sprayer. Also, spatter while your base coat is still slightly tacky rather than all the way dry. I based these columns about a third of the way around at a time, spattered and then let dry before twisting to base and spatter the next section. You can see there are still a couple places with some minimal running, but they aren’t so bad as to attract attention. If a section seems to run way too much on you, then some of the base color can be sponged over the area to break it up and fix it. The foam details and aluminum corners were prepped with the same base and spatter coat after being properly primed. We let this step dry overnight.
Rust detail 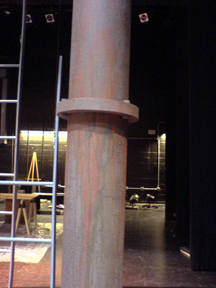
When that was completely dry, the carpenters got the pipes that were to be vertical standing, and the horizontal ones were hooked together and placed on sawhorses. Grimy, rusty yuckyness on pipes tends to occur from gunk leaking out at the seams and causing corrosion. The designer wanted mostly rust color corrosion, with maybe a touch of yucky green-black too. To get corrosion with an organic feel, I first put a coat of water on the pipe in the approximate shape I wanted the large drips to be. I then dipped a brush into my first corrosion color and dabbed it along the seam the corrosion would be coming from. Then I added some water to that area until the corrosion color started to drip in the path I had set for it. If you don’t do the water step, what you’ll find is that you get a lot of really thin spidery-looking drip paths that go pretty much straight down. By prepping it with water, you can create much larger scale, more realistic looking drips. I alternated between adding color to the drips the way I described, and adding other variations of corrosion color with a wet spatter.
To get the corrosion that goes upward, rather than dripping down, I used watered down paint to imitate the way the dripping had occurred below, and then spattered some variation into the wet areas. The watered down paint still dripped down, but since I had shaped the 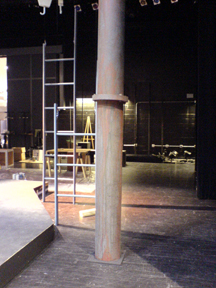 edges to look similar to the bottom ones, the direction of the dripping looked fine.
I let my first set of drips dry and did a second set of drips later, varying the location and the colors used.
This drip step should be done very quickly. The first round of dripping was done in about an hour for all the piping and then we let that dry and the second step also took about an hour. If you don’t move quickly enough things will dry partially and get muddy and do yucky things. If you work quickly and with a certain amount of sloppiness to your technique, the results will probably end up being better and more realistic.