For the purpose of this tutorial, the wall we are making is made of cut rocks for a formal English garden that is barren of plant life. I’m not going to talk much about the design process or style choices on this one. This article is more about the how to than the why.
Step 1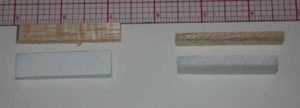
First I decided on a size for the walls. I made the wall itself about 2’-4” tall, but the block parts only 2’-0” tall, with a capstone piece. My cut rock blocks will then be about 1’-0” tall a piece and about 2’-0” wide. For the capstone piece I used bass wood , although any matte board or foam core the right thickness would have done the trick. For the blocked portion I used 3/16″ foam core
 . I cut them to the correct overall sizes.
Step 2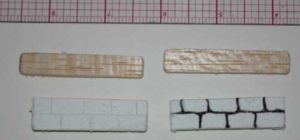
I pulled the top, glossy layer of paper off the foam core on both sides, leaving a thin layer of textured paper. I sanded the corners with an emory board to round them off on both the wood and foam core. Then I laid out where my block would be lightly with a ruler. After that, I took a ballpoint pen
 and with a heavy hand drew in the lines for between the blocks. I was careful to not be too straight and to indent the surface while drawing, while not breaking through the surface of the paper too often.
Step 3
I glued my blocks to my cap with tacky glue . Then I coated the whole thing with a layer of thin gesso that I dabbed on for the texture I wanted, which helped bring the foam core and wood into the same place and added some texture. I let that dry and then washed the surface with some browns. (I used brown watercolors but you could also water down a thicker paint.) The black from the ball point pen bled through the layers of gesso
 and paint to give an added depth to the cracks between the rocks.
Finally
Last I placed the walls in my model, which is getting close to being complete and admired my work.
Variations
It is easy to use this technique to create a number of different effects. When making bricks, with light colored grout, I simply use a ballpoint that has run out of ink to make my lines. To make a more random “natural” rock wall, freehand the rock shapes, and maybe pick at the foam a bit more to give it more texture. Also, a thicker gesso will add more texture, but be careful not to obliterate your drawn in cracks.